Cara Upload Video TikTok HD Tanpa Pecah: Rahsia Sebenar
Baca dalam bahasa lain: English version below ↓
Assalamualaikum dan salam sejahtera semua.
Kalau perasan, di TikTok sekarang bertebaran orang upload video HD, tak pecah. Bila ditanya, mereka bagitahu upload melalui TikTok Web.
Ya, itu memang betul. Kena guna TikTok Web.
Tapi ada satu langkah lagi yang mereka tak kongsi. Dan tanpa langkah tu, video anda tetap keluar buruk walaupun dah guna PC. Saya kongsikan semuanya dalam artikel ni, dari mula rakam sampai tekan post.
1. Rakam pada kualiti tertinggi
Untuk dapat video terbaik, rakam pada 4K atau 1080p. Kalau nak nampak smooth, rakam pada 60FPS. Saya biasa rakam 4K 60FPS.
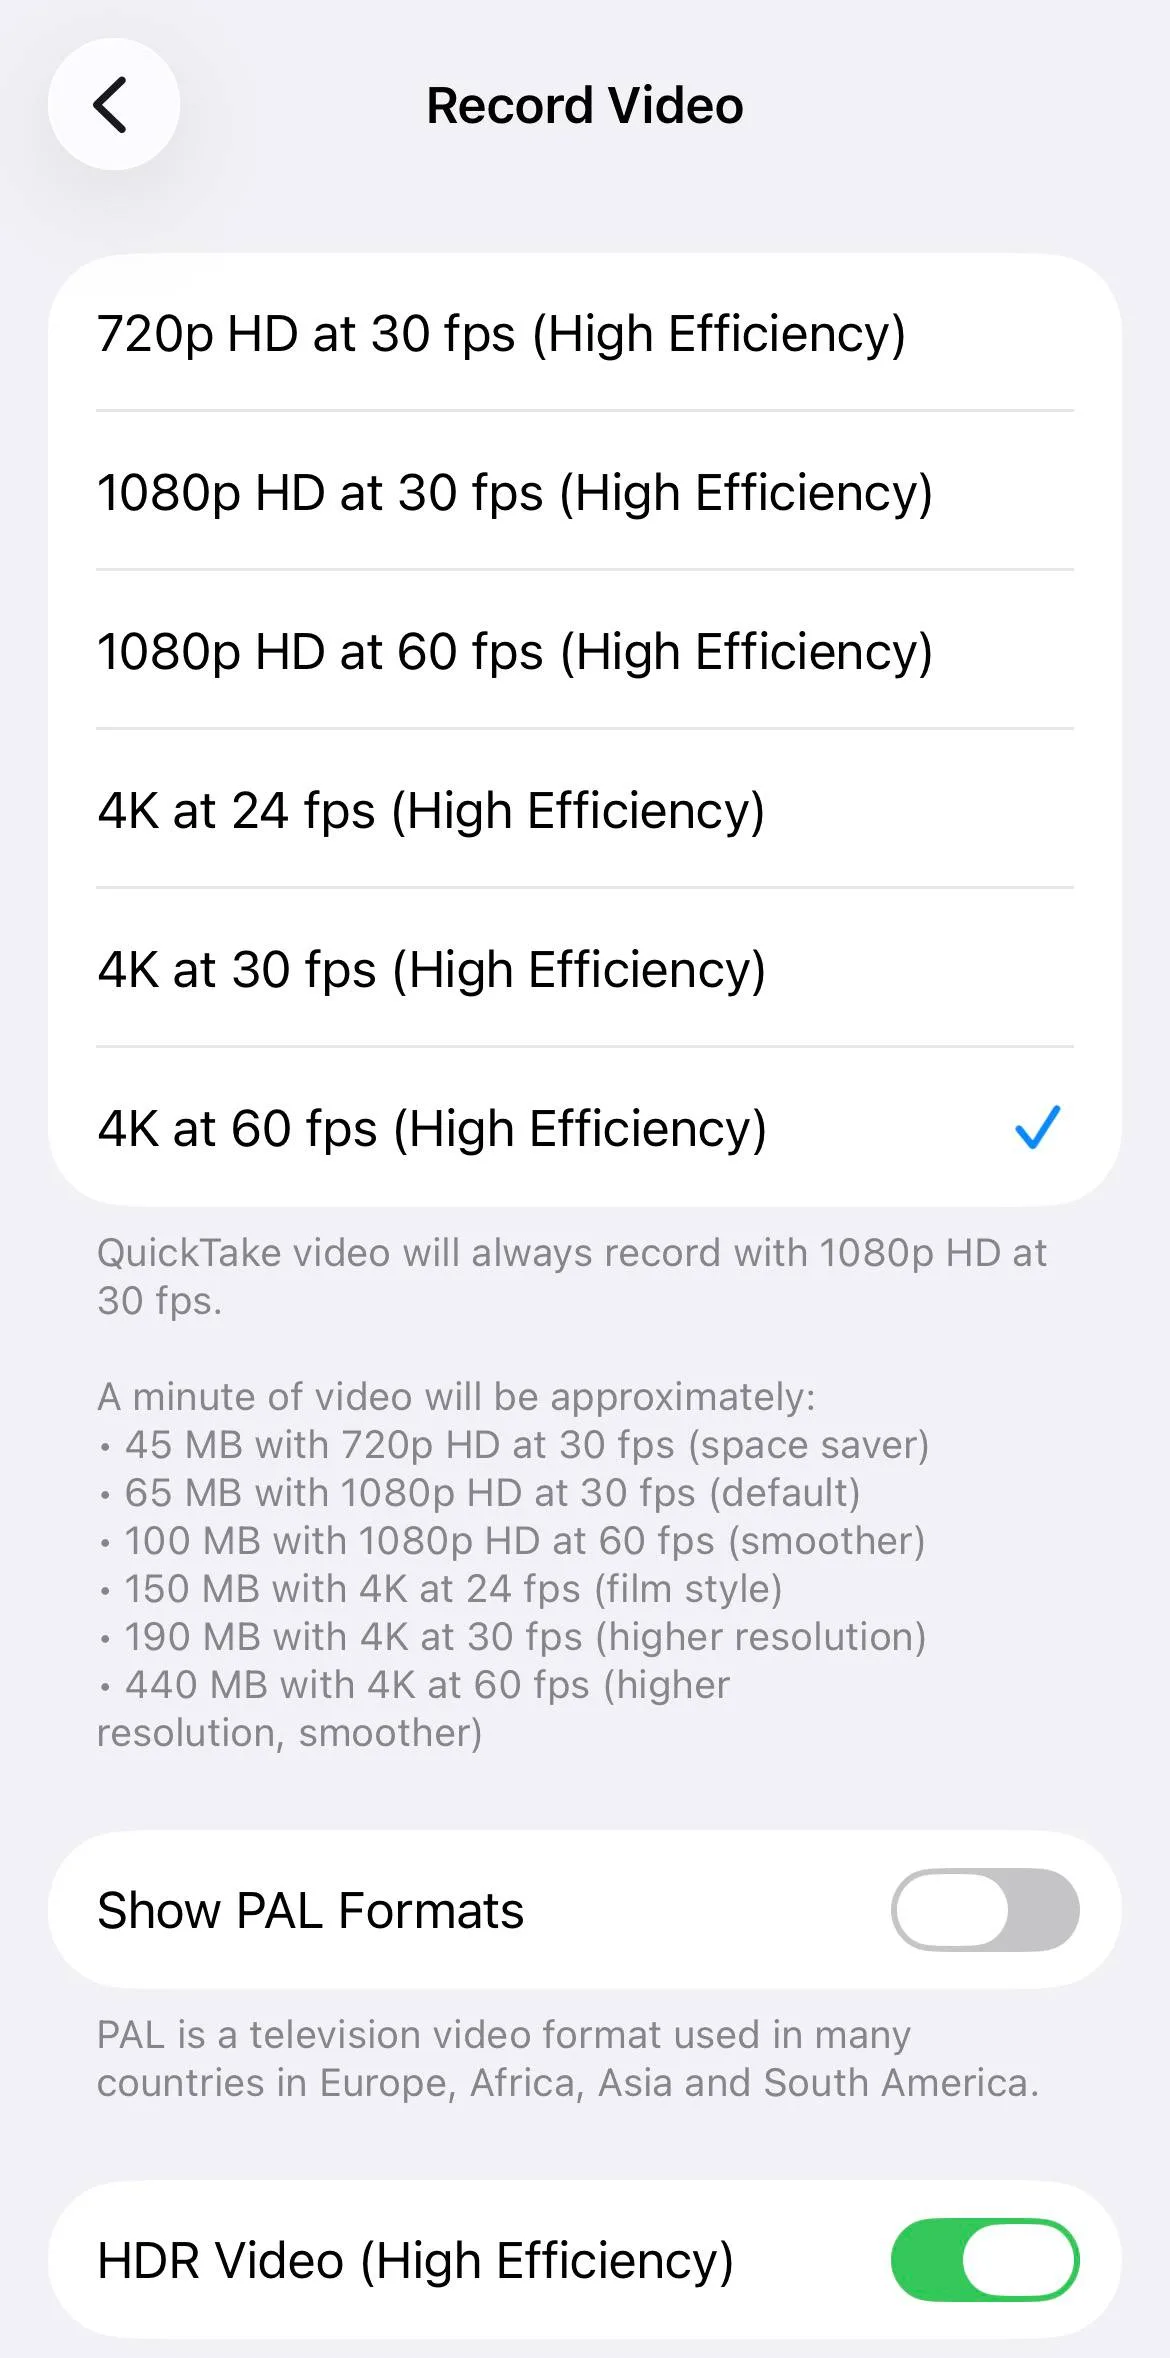
Sebabnya mudah. Alat penyuntingan tak boleh cipta detail yang memang tak ada dalam fail asal. Apa yang anda rakam itulah siling kualitinya. Kalau rakam 720p, tak ada apa nanti boleh naikkan ia jadi 1080p yang sebenar.
2. Eksport melalui aplikasi suntingan
Selesai rakam, masukkan dalam aplikasi suntingan seperti CapCut. Bahagian eksport ni yang paling penting sekali.
Pastikan tetapan macam ni:
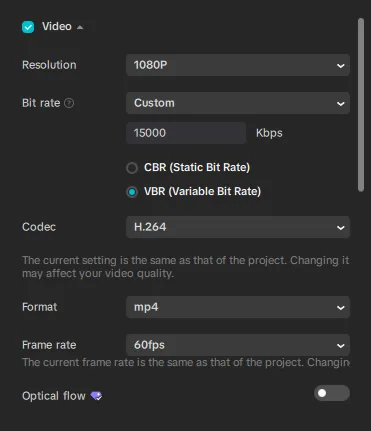
- Resolusi: 1080P
- Frame rate: 60fps kalau video asal 60fps. Kalau 30fps, pilih 30fps
- Bit rate: Custom, antara 10,000 sampai 15,000 Kbps
- Codec: H.264
- Format: mp4
Kemudian eksport.
Kenapa langkah ni tak boleh dilangkau
Ramai fikir kalau dah rakam 4K, terus upload pun jadi. Tak jadi.
Tengok balik gambar tetapan rakaman tadi. Ada perkataan High Efficiency di situ. Itu maksudnya telefon anda merakam dalam format HEVC (H.265). Format tu memang cantik dan jimat ruang, tapi TikTok bermasalah dengannya.
Bila eksport melalui CapCut dengan codec H.264, barulah fail tu jadi format yang TikTok proses dengan betul.
Jadi langkah eksport ni bukan sekadar untuk potong video. Ia menukar format fail anda kepada yang TikTok terima. Resolusi tak ada kaitan di sini. Video 4K pun akan bermasalah kalau ia masih HEVC.
3. Semak fail selepas eksport
Jangan terus percaya. Semak dulu.
Klik kanan pada fail, pilih Properties, kemudian tab Details.
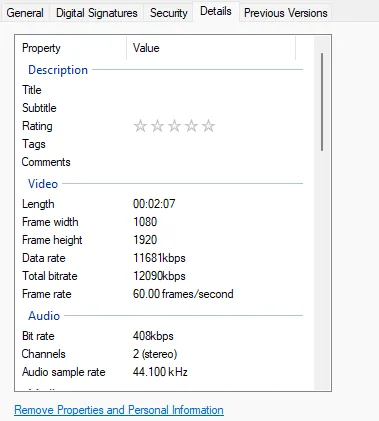
Yang perlu disemak:
- Frame width dan height patut 1080 x 1920
- Total bitrate patut dalam lingkungan 10,000 sampai 15,000 kbps
- Frame rate patut sama dengan yang anda pilih masa eksport
Satu perkara yang mungkin buat anda keliru. Dalam contoh ni saya set 15,000 Kbps masa eksport, tapi fail siap menunjukkan 12,090 kbps.
Itu normal. Sebabnya saya pilih VBR (Variable Bit Rate) masa eksport. Dengan VBR, nombor yang anda set tu adalah siling, bukan angka tetap. Bahagian video yang kurang bergerak akan guna bitrate lebih rendah. Selagi ia dalam lingkungan 10,000 ke atas, itu sudah memadai.
4. Patch video sebelum upload
Haa, sekarang inilah bahagian yang ramai tak kongsi.
Sebelum upload, video kena “dibaiki” struktur failnya dahulu. Ada satu resepi yang perlu dimasukkan ke dalam fail tu, dan resepi ini yang buat TikTok berhenti menurunkan taraf video anda.
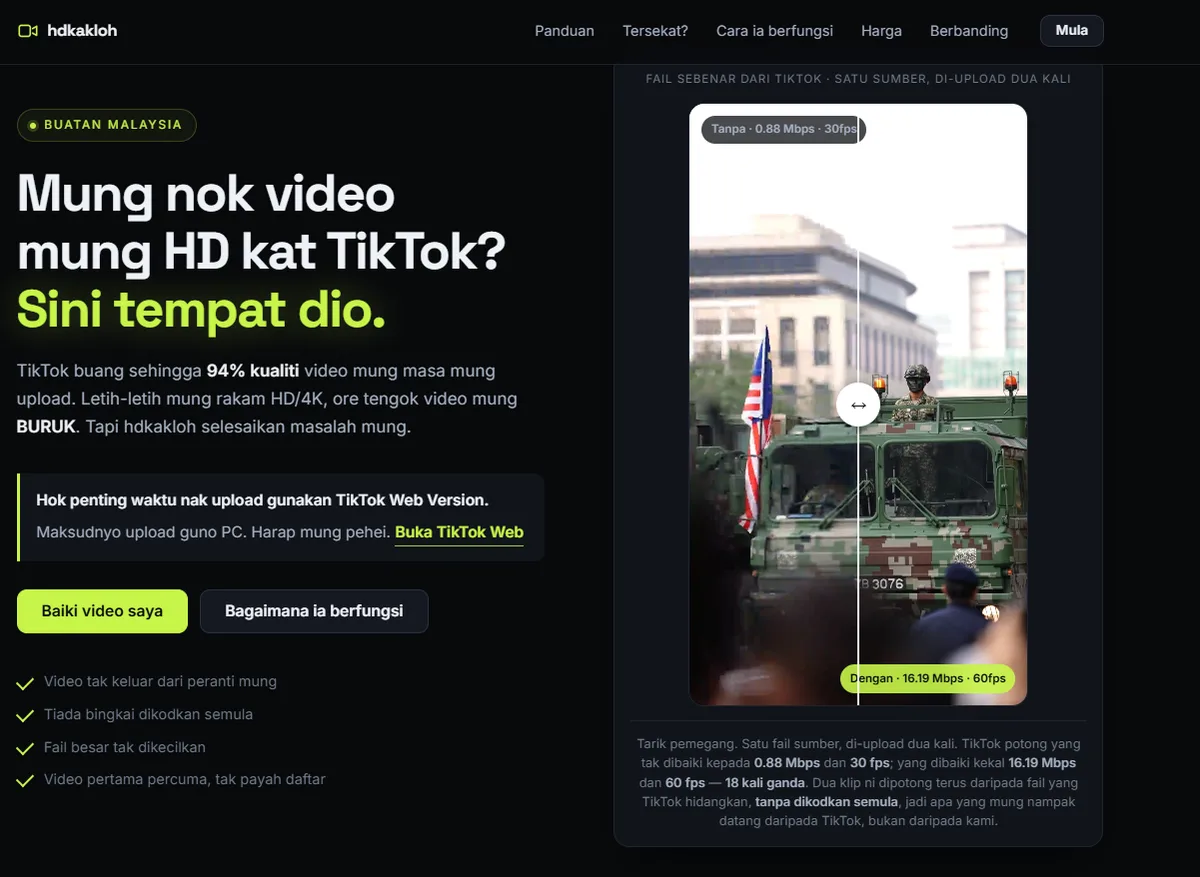
Alat untuk buat ni ada di hdkakloh.xyz.
Cara guna dia senang. Buka laman tu di komputer, seret fail video masuk, tunggu sekejap, kemudian simpan fail baharu yang keluar.
Dua perkara yang saya suka pasal alat ni:
- Video tak keluar dari komputer anda. Semua proses berlaku dalam pelayar sendiri
- Tiada bingkai dikodkan semula. Jadi kualiti asal tak berkurang langsung
Video pertama percuma, tak payah daftar apa-apa.
5. Upload melalui TikTok Web di komputer
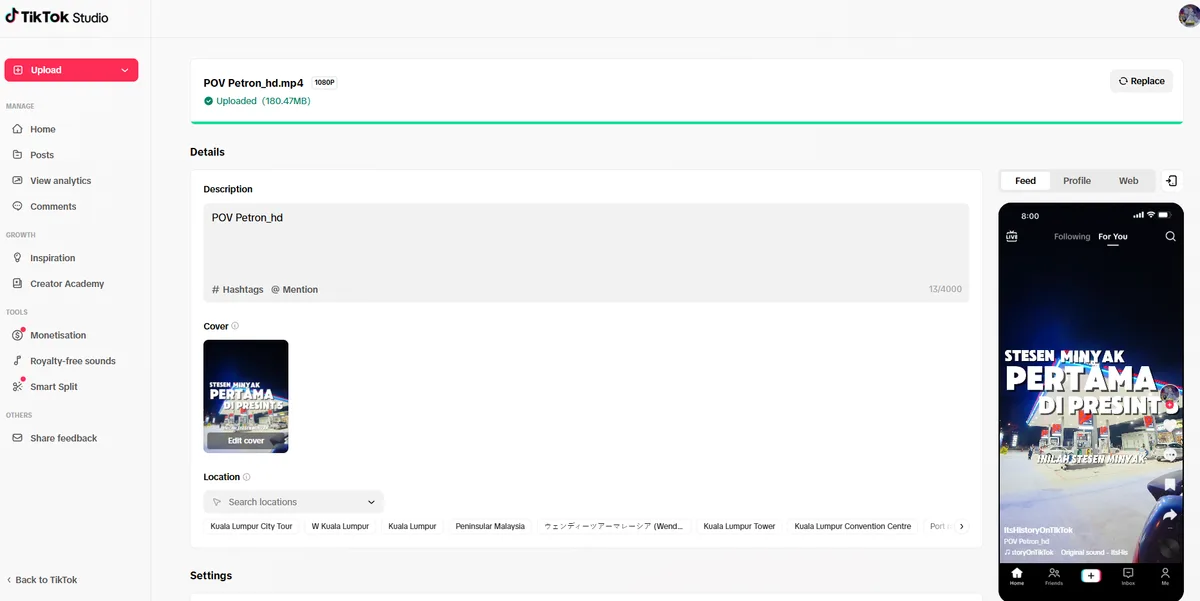
Lepas dah patch, barulah mula proses upload. Waktu upload memang kena guna PC, sebab kita nak guna TikTok Web.
Jangan upload dari aplikasi telefon
Ini penting sangat, jadi saya ulang.
Kalau anda pindahkan fail yang dah dipatch tu ke telefon, kemudian upload melalui aplikasi TikTok, semua kerja tadi akan hilang.
Sebabnya aplikasi telefon memampat semula video sebelum menghantarnya. Jadi struktur fail yang kita baiki tadi musnah sebelum ia sempat sampai ke TikTok.
Yang paling menyusahkan, tiada mesej ralat akan keluar. Tiada amaran. Video anda cuma akan nampak biasa macam sebelum ni, dan anda takkan tahu kenapa.
Jadi kalau nak upload, guna komputer melalui tiktok.com.
6. Semak tetapan sebelum post
Sebelum tekan post, semak semua bahagian dahulu. Scroll ke bahagian Settings.
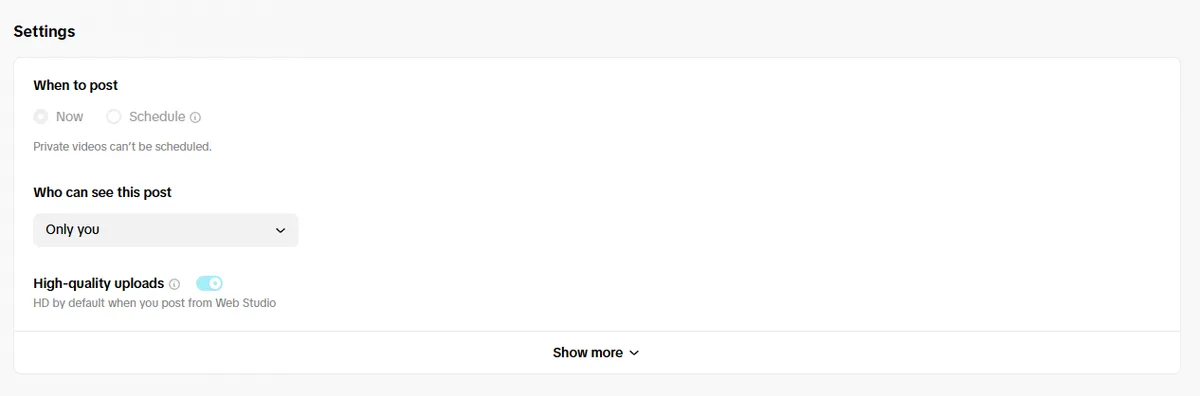
Dua benda yang perlu diperiksa di sini:
Pertama, hidupkan “High-quality uploads”. Toggle ni ada di bawah sekali. TikTok sendiri tulis “HD by default when you post from Web Studio”. Pastikan ia biru, bukan kelabu.
Kedua, set “Who can see this post” kepada “Only you”. Buat masa ni sahaja, bukan selamanya.
Kenapa? Sebab kita nak periksa hasilnya dulu sebelum orang lain nampak. TikTok ambil masa untuk memproses video selepas anda post. Kalau terus public dan rupanya pecah, video tu dah pun muncul di feed orang dalam keadaan buruk.
7. Periksa di telefon, kemudian tukar kepada Public
Tekan post. Kemudian buka akaun TikTok anda melalui telefon dan tengok hasilnya di sana.
Tengok di telefon, bukan di komputer. Sebab kebanyakan penonton anda menonton di telefon, jadi itulah paparan yang sebenar.
Kalau nampak elok dan tak pecah, barulah tukar dari “Only you” kepada “Public”.
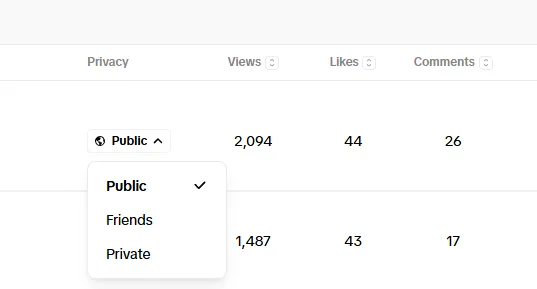
Kalau masih pecah, jangan risau. Balik semula ke langkah 2 dan semak tetapan eksport anda. Selalunya masalahnya di situ.
Ringkasan pantas
- Rakam 4K atau 1080p, 60FPS
- Eksport dari CapCut: 1080P, H.264, mp4, bitrate 10,000 sampai 15,000 Kbps
- Semak fail siap guna Properties dan Details
- Patch fail di hdkakloh.xyz
- Upload melalui tiktok.com di komputer, bukan aplikasi telefon
- Hidupkan High-quality uploads, set kepada Only you
- Periksa di telefon, kemudian tukar kepada Public
Begitulah langkahnya untuk post di TikTok pada kualiti yang sebenar.
Sedikit tentang alat tu
hdkakloh bukan saya yang bina. Ia dibangunkan oleh Rex, dan saya kongsikan di sini sebab ia menyelesaikan masalah yang saya sendiri hadapi setiap kali nak upload video.
Kalau nak tanya apa-apa, channel Telegram dia ada di t.me/hdkakloh
English Version
Read in another language: Versi Bahasa Melayu di atas ↑
You have probably noticed it. TikTok is full of people posting videos in proper HD, no pixelation, no mush. Ask them how, and they will tell you to upload through TikTok Web.
That part is true. You do need TikTok Web.
But there is one more step they rarely mention. Without it, your video still comes out looking bad even when you upload from a computer. Here is the whole process, from the moment you start recording to the moment you hit post.
1. Record at the highest quality
Record at 4K or 1080p. If you want smooth motion, record at 60FPS. I normally record at 4K 60FPS.
The reason is simple. No editing app can invent detail that was never captured. Whatever you record is your ceiling. Record at 720p and nothing later will turn it into real 1080p.
2. Export through an editing app
Once you have finished recording, bring the footage into an editing app such as CapCut. The export step is the one that matters most.
- Resolution: 1080P
- Frame rate: 60fps if your source is 60fps. If it is 30fps, choose 30fps
- Bit rate: Custom, between 10,000 and 15,000 Kbps
- Codec: H.264
- Format: mp4
Then export.
Why you cannot skip this step
Many people assume that recording in 4K is enough on its own. It is not.
Look again at the recording settings above. Notice the words High Efficiency. That means your phone is recording in HEVC (H.265). It is a lovely format and it saves a lot of storage, but TikTok does not handle it well.
Exporting through CapCut with the H.264 codec is what turns your file into something TikTok processes properly.
So this export step is not just about trimming your clip. It converts your file into a format TikTok accepts. Resolution has nothing to do with it. Even a 4K file will run into trouble if it is still HEVC.
3. Check the file after exporting
Do not take it on trust. Verify it.
Right click the file, choose Properties, then open the Details tab.
What to look for:
- Frame width and height should read 1080 x 1920
- Total bitrate should sit somewhere between 10,000 and 15,000 kbps
- Frame rate should match what you chose on export
One thing might confuse you here. In this example the export was set to 15,000 Kbps, yet the finished file reports 12,090 kbps.
That is normal. The export used VBR (Variable Bit Rate), which means the number you set is a ceiling rather than a fixed value. Quieter, less busy parts of the video use less. As long as it stays above 10,000, you are fine.
4. Patch the video before uploading
Here is the part almost nobody talks about.
Before uploading, the internal structure of the file needs fixing. There is a particular recipe that has to go into the file, and that recipe is what stops TikTok from downgrading your video.
The tool that does it lives at hdkakloh.xyz.
Using it is straightforward. Open the site on your computer, drag your video in, wait a moment, then save the new file it produces.
Two things I like about it:
- Your video never leaves your computer. Everything happens inside your own browser
- No frames are re-encoded, so nothing is lost from the original quality
The first video is free and needs no sign up.
5. Upload through TikTok Web on a computer
With the file patched, you can finally upload. This has to happen on a computer, because we need TikTok Web.
Do not upload from the phone app
This one matters enough to repeat.
If you move the patched file onto your phone and upload it through the TikTok app, every bit of that work is thrown away.
The phone app re-compresses video on the device before sending it. The structure we just repaired is destroyed before the file ever reaches TikTok.
The worst part is how quiet the failure is. No error message. No warning. Your video simply looks ordinary again, and you will have no idea why.
So when it is time to upload, use a computer and go to tiktok.com.
6. Check your settings before posting
Before you hit post, scroll down to the Settings section and check it properly.
Two things to look at here:
First, switch on “High-quality uploads”. The toggle sits near the bottom. TikTok itself describes it as “HD by default when you post from Web Studio”. Make sure it is blue, not grey.
Second, set “Who can see this post” to “Only you”. Just for now, not permanently.
Why? Because we want to inspect the result before anyone else sees it. TikTok takes time to process a video after posting. If you go straight to public and it turns out badly, it has already reached people’s feeds looking rough.
7. Check on your phone, then switch to Public
Hit post. Then open TikTok on your phone and look at the result there.
Check on the phone, not the computer. Most of your audience watches on a phone, so that is the view that actually counts.
If it looks clean, switch it from “Only you” to “Public”.
If it still looks broken, do not worry. Go back to step 2 and check your export settings. That is usually where the problem is.
Quick summary
- Record at 4K or 1080p, 60FPS
- Export from CapCut: 1080P, H.264, mp4, bitrate between 10,000 and 15,000 Kbps
- Verify the finished file through Properties and Details
- Patch the file at hdkakloh.xyz
- Upload through tiktok.com on a computer, never the phone app
- Turn on High-quality uploads, set the post to Only you
- Check it on your phone, then switch to Public
That is the full process for posting to TikTok at the quality you actually recorded.
About the tool
I did not build hdkakloh. It was developed by Rex, and I am sharing it here because it solved a problem I kept running into myself every time I wanted to upload a video.
If you have questions, its Telegram channel is at t.me/hdkakloh

Komen
Kongsi pendapat cikgu, atau soalan lain yang berkaitan.